1. Stop turning and 1/4 turn to stop
2. Check depth of oil seal before removal
3. Put markings on belts or flanges of alternator adjusting bracket or distributor flange before removal.
4. Retighten all bolts before closing on the cover of Evaporator cover.
The information provided are in a majority of cases heuristic in approach. It is hope that valuable insights can be gained and it is intended to provoke further thoughts or suggestions.
Saturday, October 30, 2010
Tuesday, September 21, 2010
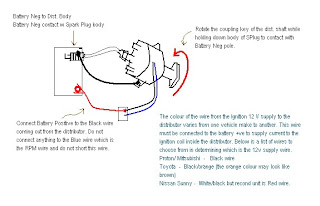
Distributor Spark Test
Click the diagram to enlarge.
|
How about testing the distributor in the shop where it is not connected to any vehicle. This can be done by following the diagram here which will give an idea as to whether the distributor is good or bad by merely looking for sparks when the distributor is turned by hand (wear gloves ) as illustrated here.
Thursday, July 15, 2010
Power Window
There are many old cars out there and there are many problems that creep in as the car starts to age. One of the problem could be the Power Window motor which operates intermittently for no apparent reason.
Checking for proper ground is the first thing to look for and also the available voltage at the motor terminals can very well hit the mark but sometimes even proper ground and nominal voltage check reveal no problem. In this case it could be the motor itself. A replacement would be a good idea but costly and it may well be the circuit breaker integrated into the motor unit that is causing the problem.
One way to resolve this is to remove the motor housing and solder a jumper wire across the circuit breaker as shown below:
Solder across the two terminals lying on both sides of the circuit breaker ( circuit breaker is the tapered metal piece with a round dot at the top).
As a precautionary measure, add a 10A fuse in series with the blue wire leading out of the motor assembly.
Saturday, April 17, 2010
Backprobing Electronic Connectors
Backprobing electronic connectors provide a useful means of diagnosing a probable open or short circuit in any situation. However backprobing must be done carefully so as not to cause a short circuit in itself hence creating more problems. This means a very sharp, long and thin probe is ideal in this situation. A good idea is to remove the inner body of an insulation piercing clip (photo) and connect the end via a banana clip to the DMM (digital multimeter).
Subscribe to:
Comments (Atom)


