Sunday, December 13, 2015

Distributor Insertion Techniques

Normally insertion of the Distributor is quite straightforward if you remember the angle you withdrew in the first place in exactly the same position when you withdrew it and provided the crankshaft had not been turned or disturbed since the last time you took the distributor off the cylinder head.
If the crankshaft pulley has been turned for whatever reason after the distributor had already been removed earlier, then it is imperative that you need to get the correct timing before inserting the distributor back into its fold.
The picture below can summarize quite a lot in terms of the explanation that entails with it :

Wednesday, May 6, 2015

Power Window Diagnosis and Methodology

Power Window Switch
Power Windows problems are usually caused by oxidation in the joints as do many electrical connects but shorting to ground is also common. A basic understanding of the circuitry is important and the best approach is using a test pen to pin point by back probing the connectors with the ign on , the ground pins and the live pins.
Test pen can be used to test ground or live as follows:

Monday, April 20, 2015

Brake Bleeding
 
Contaminated content
Brake Wheel Cylinder
Brake bleeding must be performed whenever the brake pedal felt 'spongy' or any brake components are replaced, for example, brake shoes, brake pads, brake calliper pistons, brake wheel cylinders or every 50,000 km or 5 years or more.  Vehicles that are 5 years or more will have brake fluid heavily contaminated and the water absorbed in the brake fluid will corrode the brake wheel cylinders, the brake piston chambers etc.. Brake bleeding at the rear wheels normally will show a highly contaminated brown fluid oozing out of the brake nipple.

Sunday, June 15, 2014

ISC check cleaning and replacement


Of Mitsubishi variant, the ISC (Idle Speed Control) servo valve need to be cleaned especially the secondary gear support shaft. This support shaft is basically a hollow sleeve that accepts the secondary gear which will turn according to the engine load demand by opening the bypass air passage from below the throttle body to allow more air into the throttle body which will raise the rpm especially during idling  where the vacuum is greatest. These transfer gear may crack as they are made of plastic and if true will need to be replaced.

Thursday, October 17, 2013

C22 Vac Hose connections at Air Cleaner end


C22 Vac Hoses
Convoluted as it seems , but prior to removing the C22 carburettor cover, it is prudent to remember all the hose connections before doing so as the various components connected require the right vac to perform properly. For fuel emission control purposes, the EGR connection on the left is crucial which essentially recirculates the exhaust gas back to the base of the Carb to reduce oxides of nitrogen. The other vac hose connected to the Carb body (upper side) which goes half round the top of the cylinder head cover is connected to the distributor Vac advance mechanism. Make sure this line display vacuum when the engine is running as this enables ignition to advance as the engine gathers speed.

Monday, September 9, 2013

Auto Trans Pressure Test Table

Proper testing of the pressure at various points in the Auto Transmission Unit can reveal a lot about the condition of the AT box. A simple yet effective prognosis for instance could be the popular disconnection of the oil cooler hose and check if the ATF fluid oozes out when the Auto Box is in motion as proof of the working status of the TC (torque converter)  but more often there is more than that.

Monday, September 2, 2013

Rear Absorber with mc pherson type strut

4G13 Rear Absorber Replacement
It is better to remove the two bolts starting with the one at the brake drum and then the bolt between the absorber to the rear suspension lower arm. Removing only the absorber bolt requires a lot of effort to pry out the absorber later leading to a lot of stressed area and possibly damage to the attachments.

Wednesday, July 20, 2011

Rear Axle Shaft Removal


The rear axle shaft must be disconnected from the differential housing before the differential carrier can be removed. A slide hammer is required to withdraw the axle together with the brake back plate as a unit as shown above.

Tuesday, July 5, 2011

Vital Jacking Points at High

                                    Vital and Safety Jack Up points prior to clutch removal and replacement incl. Rear Differential Carrier Unit at the Back. Note: the wheel lugs at the back are loose awaiting for disconnection of the rear driveshaft in order that the Rear Differential Carrier can be removed.

Sunday, June 12, 2011

Reprogramming new transmitter unit to the Car

If two units of Central Door Lock control transmitter unit are bought ( M2) you need to register it with the receiver unit in the car as follows:

1. Insert the key into the ign switch key cylinder.
2. Turn the key to ON and OFF 5 TIMES IN A ROW with the ign key resting on the ON position.
3. There will be 1 or 2 beep indicating it is open for registration.
4. Press the button at the transmitter unit twice.
5. There will be 1 or 2 beep indicating it is registered. ( if only one transmitter unit jump to point 8 below)
6. Press the button of the second transmitter unit twice.
7. There will be 1 or 2 beeps indicating that this too has been registered.
8. Switch off the ign key and remove it.
9. Close the door and use the remote transmitter central door locking unit to unlock and lock the doors to confirm.

Saturday, October 30, 2010

Some salient points

1. Stop turning and 1/4 turn to stop
2. Check depth of oil seal before removal
3. Put markings on belts or flanges of alternator adjusting bracket or distributor flange before removal.
4. Retighten all bolts before closing on the cover of  Evaporator cover.

Tuesday, September 21, 2010

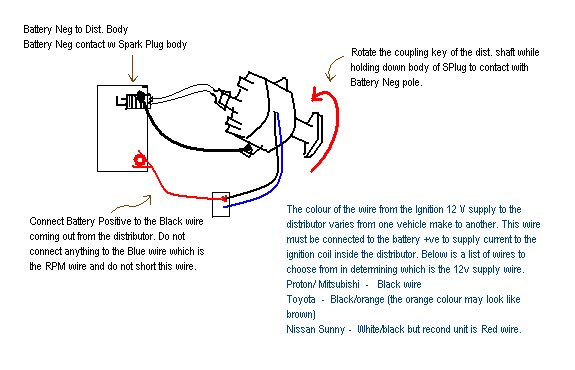
Distributor Spark Test


Click the diagram to enlarge.
It is relatively easy to determine the distributor of a vehicle is generating sparks by detaching the distributor center electrode and place it very close to the body of the engine and see if it sparks across the body of the engine when it is cranked.
How about testing the distributor in the shop where it is not connected to any vehicle. This can be done by following the diagram here which will give an idea as to whether the distributor is good or bad by merely looking for sparks when the distributor is turned by hand (wear gloves ) as illustrated here.


Thursday, July 15, 2010

Power Window

There are many old cars out there and there are many problems that creep in as the car starts to age. One of the problem could be the Power Window motor which operates intermittently for no apparent reason.
Checking for proper ground is the first thing to look for and also the available voltage at the motor terminals can very well hit the mark but sometimes even proper ground and nominal voltage check reveal no problem. In this case it could be the motor itself. A  replacement would be a good idea but costly and it may well be the circuit breaker integrated into the motor unit that is causing the problem.
One way to resolve this is to remove the motor housing and solder a jumper wire across the circuit breaker as shown below:

 Solder across the two terminals lying on both sides of the circuit breaker ( circuit breaker is the tapered metal piece with a round dot at the top).

As a precautionary measure, add a 10A fuse in series with the blue wire leading out of the motor assembly.

Saturday, April 17, 2010

Backprobing Electronic Connectors

Backprobing electronic connectors provide a useful means of diagnosing a probable open or short circuit in any situation. However backprobing must be done carefully so as not to cause a short circuit in itself hence creating more problems. This means a very sharp, long and thin probe is ideal in this situation. A good idea is to remove the inner body of an insulation piercing clip (photo) and connect the end via a banana clip to the DMM (digital multimeter).

Saturday, October 3, 2009

Angle Torque Wrench


This is an Angle Torque Tool.
Make sure that the stop rod (black color L rod) is slightly shorter than the ext bar and socket as shown below. Otherwise the socket will not sit at the bottom of the cylinder head bolt properly.
The stop rod can be placed outside of the cylinder head wall for support or it could be placed inside whichever is convenient.
This tool is typically attached to a 9½ inch ext rod and a ratchet wrench of 200Nm or more of torque capability.

Friday, September 25, 2009

Questions on Automotive Competency

Attempt to answer the following questions to gauge your knowledge on the general aspects of  automotive repair etc..  (some of the questions are tricky, hence you need to read carefully )

1. Which sensor output is the engine rpm of the car ?

     a. Coolant Temperature Sensor
     b. Wheel Speed sensor
     c. Oxygen sensor
     d. Crank Angle sensor

Monday, September 7, 2009

Simple short circuit test


The diagram on the left is a very simple and effective way of checking for short circuits in most vehicles but the battery terminal must be disconnected.
Unless you are checking for proper ground of this wire i.e. it is a ground wire, a positive swing of the multimeter indicating continuity means that the wire is somewhere grounded in its path before reaching to another component or point in the electrical path.
Do not use this test on wires which are unknown to you as it could damage sensitive electronic components.

Tuesday, September 1, 2009

Mit Throttle and Ign Timing Service

Start the Car
Warm it up
Ground the Ign timing adj terminal (brown colour) with jumper wire.
Scanner to check the TPS value for (mV) and (%) opening and record it down.
Use scanner to check idle rpm of 750±50. If ok, skip below para.

If cannot achieve the above rpm, clean the throttle body as follows:
Remove air cleaner. (remove ign timing adj jumper wire if you have earlier connected it)
Plugged the air bypass hole at the bottom.... .....

Thursday, July 2, 2009

Power Steering Rack & Pinion with tie rod ends


The power steering boot can be removed once the tie rod ends which can be seen at both ends are screwed off its ends by first loosening the 19mm inner lock nut clockwise (inwards) and then turning the tie rod end anti-clockwise to remove it. Care must be taken to count the number of turns anti-clockwise on the tie rod end so that reinstallation will not be a problem. In any case, a wheel alignment is necessary after the Power Steering Assembly is removed for service since the alignment is bound to be affected.