
Wednesday, July 20, 2011
Rear Axle Shaft Removal
Tuesday, July 5, 2011
Vital Jacking Points at High
 |
| Vital and Safety Jack Up points prior to clutch removal and replacement incl. Rear Differential Carrier Unit at the Back. Note: the wheel lugs at the back are loose awaiting for disconnection of the rear driveshaft in order that the Rear Differential Carrier can be removed. |
Sunday, June 12, 2011
Reprogramming new transmitter unit to the Car
If two units of Central Door Lock control transmitter unit are bought ( M2) you need to register it with the receiver unit in the car as follows:
1. Insert the key into the ign switch key cylinder.
2. Turn the key to ON and OFF 5 TIMES IN A ROW with the ign key resting on the ON position.
3. There will be 1 or 2 beep indicating it is open for registration.
4. Press the button at the transmitter unit twice.
5. There will be 1 or 2 beep indicating it is registered. ( if only one transmitter unit jump to point 8 below)
6. Press the button of the second transmitter unit twice.
7. There will be 1 or 2 beeps indicating that this too has been registered.
8. Switch off the ign key and remove it.
9. Close the door and use the remote transmitter central door locking unit to unlock and lock the doors to confirm.
Saturday, October 30, 2010
Some salient points
1. Stop turning and 1/4 turn to stop
2. Check depth of oil seal before removal
3. Put markings on belts or flanges of alternator adjusting bracket or distributor flange before removal.
4. Retighten all bolts before closing on the cover of Evaporator cover.
2. Check depth of oil seal before removal
3. Put markings on belts or flanges of alternator adjusting bracket or distributor flange before removal.
4. Retighten all bolts before closing on the cover of Evaporator cover.
Tuesday, September 21, 2010
Distributor Spark Test
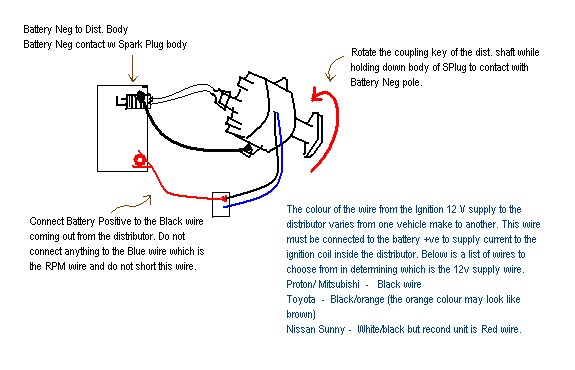 |
Click the diagram to enlarge.
|
How about testing the distributor in the shop where it is not connected to any vehicle. This can be done by following the diagram here which will give an idea as to whether the distributor is good or bad by merely looking for sparks when the distributor is turned by hand (wear gloves ) as illustrated here.
Subscribe to:
Posts (Atom)